How to Fix Lower Back Pain When Rucking (Without Changing Your Pack)
As an Amazon Associate we earn from qualifying purchases. This page contains affiliate links — if you buy through them, we earn a small commission at no extra cost to you.
Put your hands on your hips right now and slide your thumbs outward until you feel bone. That ridge — the top of your pelvis — is where a loaded rucksack is meant to rest. If your pack’s hip belt is sitting anywhere else, you’ve just found the reason your lower back aches after every session.
Most people assume a sore lower back after rucking means the load is too heavy, the pack is the wrong one, or their body isn’t ready for it yet. Usually none of that is true. You can carry a sensible weight, on a decent rucksack, on reasonable terrain, and still finish sore because of one missed adjustment — the belt sitting around your waist instead of on the bony ridge that’s built to carry it.
Fixing it takes about five minutes and costs nothing: no new pack, no physio appointment, no dialling back your training. Most beginners are simply never shown where the belt is supposed to go, so nobody catches it.
Why Your Pack Might Be the Problem
Rucking — walking while carrying a loaded backpack — is good for your back. Done with a well-fitted pack, it strengthens the postural muscles, spinal erectors, upper back, and core that hold you upright against gravity. The weighted challenge forces those muscles to work harder than they would on an unloaded walk, which is why it is an effective, scalable, low-impact strength-and-endurance activity.
The problem is that a badly fitting pack can inflict discomfort that has nothing to do with how strong you are or how well you walk. Load carried in the wrong position — too low in the pack, belt fastened around the waist instead of the hips — pulls your centre of gravity backwards and increases strain through the lumbar spine.
Owners of purpose-built packs like the GORUCK GR1 often report that the shoulder straps feel stiff during the break-in period, which can amplify the sensation that the pack isn’t sitting right. What they are often feeling is the pack fighting their body’s natural curves rather than following them — and that usually traces back to the hip belt being in the wrong position before any break-in has occurred.
There is an important distinction between load and fit. Load is how much weight you are carrying. Fit is where that weight sits on your body. You can reduce your load and still have back pain if the weight is sitting in the wrong place. Conversely, a well-fitted pack can comfortably handle more load than a poorly fitted lighter one.
This isn’t about carrying less. It’s about where the load lands.
The Hip Belt Fix (The Missing Step)
Here is the step most beginners skip: the hip belt needs to sit on the iliac crest — the bony ridge at the top of your hip bones, roughly where your hands naturally come to rest on your hips. When the belt sits there, your pelvis — not your spine — takes the brunt of the load. The bones absorb it; the muscles stabilise it. This is the mechanism doing what it’s built for.
📺 Watch: How to Fit a Hiking Pack — Women Want Adventure
When the belt sits too low — fastened around the waist rather than the hips — it cannot transfer weight onto the pelvis. The load pulls down through the shoulders, stretches the spine, and lands in the lower back. You haven’t suddenly become too weak for rucking. You have just put the weight on the wrong structure.
This is why adjusting the hip belt matters more than adjusting the shoulder straps. Shoulder comfort is secondary. Hip stability is non-negotiable for back health, even if that means a hip belt that feels snug to the point of slightly tight against the iliac crest at first. It’s a fair swap once you know what it’s protecting — your shoulders will thank you for it.
How to do it:
Stand upright with your pack on. Locate the bony points at the top of your hips — you can find them by putting your hands on your hips and sliding your thumbs outward until they hit bone. That is the iliac crest. Slide the hip belt up until it sits on that ridge, then fasten it snugly. You should feel pressure on the top of your hip bones, not on your lower back or the soft flesh of your waist.
Next, tighten the load lifters — the two straps at the top of the shoulder straps that pull the pack toward your spine. These pull the load in and up, keeping it close to your centre of gravity so it doesn’t swing with each step. A pack that bounces transfers jarring loads through your spine with every footfall.
Finally, adjust the sternum strap across your chest. This keeps the shoulder straps from sliding outward under load, which would pull the whole pack away from your back and defeat the work you have just done with the hip belt and load lifters.
If your pack does not have a hip belt — some lighter day packs don’t — that is a different problem. A pack without a hip belt cannot transfer load to the pelvis at all, which means your shoulders and spine carry everything. For rucking with meaningful weight, a hip belt isn’t optional — it’s load-bearing equipment, and worth checking for before you buy rather than after.
If you have been wearing your belt too low, you will notice the difference immediately. It can feel counter-intuitive — the belt sitting high on the hips can seem wrong if you are used to wearing it around the waist — but the lower-back relief is usually fast and noticeable. Give it a few steps. The ache that was building doesn’t have to build.
Packing for Stability
Once your pack sits right, the contents inside need to cooperate. Heavy items should go close to your back, centred along the spine. This keeps the load’s balance point where your body can manage it — low and central, not swinging out to one side or pulling you backwards.
📺 Watch: How to Pack Your Ruck Sack Like A BOSS — SOFLETE
Avoid loose items that shift around inside the pack. Every time weight moves, your body has to compensate, and that micro-adjustment work accumulates into fatigue and strain over a long ruck. Use the main compartment’s compression straps if your pack has them, or pack items in a way that leaves minimal room for movement.
A practical packing order for a typical ruck: heavy items first (ruck plate (paid link), water bladder), then medium items (spare layer, food), then lighter, bulkier items (rain shell, snacks) at the front and top. This sandwich keeps the dense weight against your back and the softer items cushioning it forward.
Buy ruck plate on Amazon → (paid link)
One specific mistake that comes up repeatedly in owner feedback: keeping a heavy water bottle in a side pocket or front pouch rather than the main compartment. A full bottle in a side mesh pocket creates a pendulum effect — the pack swings slightly with each step, and that swing transmits through the shoulder straps into the spine. Keep it in the main compartment, close to your back. Sorted.
The sternum strap also helps here — it reduces lateral movement of the shoulder straps, which in turn reduces any tendency for the whole pack to sway sideways as you walk.
When to See a Professional
Rucking is used as a safe and scalable exercise to prevent back pain and improve resilience when done with proper form. For most people, adjusting the hip belt and load lifters resolves the discomfort entirely.
That said, if you have a history of back problems, a recent injury, or pain that persists or worsens despite a correct fit, see a GP or physiotherapist before continuing. Pack fit is a first step, not a cure-all. If an existing condition is being aggravated by load-bearing exercise, you need professional guidance on what load is appropriate and how to build up safely.
Persistent pain — not the mild muscle fatigue that comes with a hard walk, but pain that doesn’t ease or that gets worse after each session — is always a reason to pause and seek advice. Rucking should leave you feeling capable. If it doesn’t, something needs checking.
For readers with bone health concerns — particularly relevant for women over 50 who are considering weighted training for its bone-loading benefits — the Royal Osteoporosis Society and NHS guidance recommends checking with a GP or physiotherapist before starting any new load-bearing exercise programme. You can find their resources at theros.org.uk and nhs.uk. The gear and technique layer this article covers is one part of a broader picture; the medical layer belongs to the professionals.
Frequently Asked Questions
Is rucking bad for your back?
Rucking itself is generally good for back health when done with a properly fitted pack — it strengthens the postural muscles that support the spine. A badly fitting pack can cause discomfort and strain, but that is a fit problem, not an inherent problem with rucking as an activity.
Should I wear my backpack higher or lower?
The main compartment should sit high and close to your back, with the hip belt sitting on the iliac crest — the bony ridge at the top of your hip bones. This is higher than most people instinctively wear it. The belt should feel snug on those bony points, not loose around the soft waist below.
How do I know if my hip belt is adjusted correctly?
You should feel even pressure on the top of your hip bones — the iliac crest — when the belt is done up. You shouldn’t feel pressure in your lower back or just on the soft part of your waist. When you walk, the pack should not bounce or swing. If it bounces, the hip belt is either too loose or sitting in the wrong position.
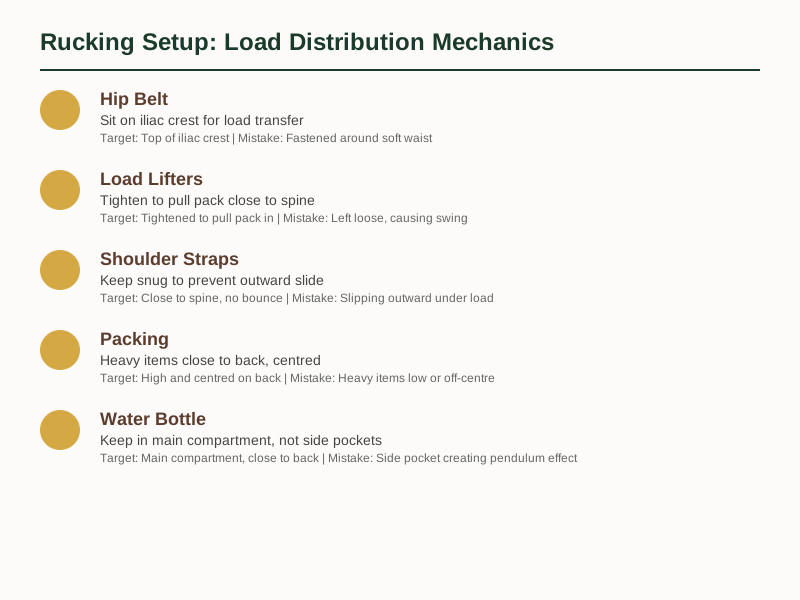
Every adjustment point above, in one place for a quick pre-walk check:
| Body Part | Target Position | Common Mistake |
|---|---|---|
| Hip Belt | Top of iliac crest (bony ridge) | Fastened around soft waist |
| Shoulder Straps | Close to spine, no bounce | Slipping outward under load |
| Load Lifters | Tightened to pull pack in | Left loose, causing swing |
| Main Compartment | High and centred on back | Heavy items low or off-centre |
| Water Bottle | Main compartment, close to back | Side pocket creating pendulum effect |
The Five-Minute Fix
The fix is straightforward once you know it: hip belt on the iliac crest, load lifters pulled tight, pack sitting close to your spine. You can check and adjust this in under five minutes before your next ruck.
What the GORUCK GR1 and similar purpose-built packs offer — when fitted correctly — is a frame and belt system designed to make this adjustment work. The pack itself isn’t the problem. The set-up was.
If you are new to rucking and want a clear-headed guide to the gear that actually matters for getting started without spending money on kit that doesn’t suit your activity, grab our free checklist. It covers the essentials — pack features to prioritise, weight guidance for beginners, and the few items that make a real difference versus the ones you can skip.
Get the Free First Ruck Gear Checklist
You will have everything you need to set up properly and get rucking without the ache. If the pain has been building over several sessions rather than easing once the belt sits where it should, our Rucking Troubleshooting: Blisters, Chafing and Pain — What Actually Works guide covers the wider picture. The positioning advice above draws on NHS guidance on safe activity and the Royal Osteoporosis Society’s recommendations on load-bearing exercise for bone health.
As an Amazon Associate we earn from qualifying purchases. The products linked above are ones we recommend based on independent research and owner feedback.