How Heavy Is Too Heavy? A Safe Guide to Bone Density Training
As an Amazon Associate we earn from qualifying purchases. This page contains affiliate links — if you buy through them, we earn a small commission at no extra cost to you.
“How heavy is too heavy?” is the wrong question, and most of what gets written about bone-density training answers it anyway — with a number that sounds precise and means almost nothing. 20% of body weight. 5%. A heart-rate zone lifted from nowhere in particular. None of it is really about the figure on the vest. Bone and connective tissue don’t respond to a percentage you calculated at home; they respond to how fast you asked them to adapt to it.
That’s the reframe this article works from. Instead of chasing a magic starting weight, we’ll cover why walking alone plateaus for bone density, what’s actually happening inside bone tissue when you load it — and overload it — and a practical progression framework built around your situation rather than a borrowed number. No fabricated heart-rate zones, no invented percentages, just the honest reasoning behind safe load progression.
Why Walking Alone Isn’t Enough for Bone Density
Walking is excellent cardiovascular exercise. The NHS recommends it as a useful form of activity for general health — it gets you moving, burns calories, and keeps joints mobile. But if your goal is improving bone density, walking alone has a ceiling.
The distinction comes down to what physiologists call weight-bearing versus resistance exercise. Walking is weight-bearing — your body weight provides the load — but it is relatively low-intensity and repetitive. The stimulus it provides to bone tissue is modest. Resistance exercise, by contrast, uses muscle strength to create a more forceful pull on bone. When your muscles contract, they tug on your tendons, and those tendons attach to your bones. That pulling force — that mechanical loading — is what actually signals bone cells to lay down more mineral.
Think of your bones like the foundation of a house. Walking is like a gentle breeze — it keeps the house standing, but it doesn’t make the foundation stronger. Rucking is like pouring concrete on that foundation. The additional load creates a meaningful mechanical stimulus that walking alone doesn’t reach.
This matters particularly for anyone with reduced bone density. The Royal Osteoporosis Society’s guidance is clear: bone-strengthening exercise should combine impact work and strength training. Walking alone doesn’t typically provide enough of either for someone working to improve bone health. Rucking — walking with added weight — bridges that gap by combining the weight-bearing element of walking with the resistance stimulus of additional load.
Swimming and cycling, while excellent for cardiovascular health and muscle endurance, don’t provide this same stimulus. They aren’t weight-bearing activities, which means the bones aren’t being loaded in a way that promotes mineralisation. If bone density is your goal, these activities are useful supplements, but they can’t replace load-bearing work.
| Activity | Weight-Bearing | Resistance Stimulus | Bone Density Relevance |
|---|---|---|---|
| Walking (unloaded) | Yes — body weight | Low | Moderate maintenance only |
| Rucking (with load) | Yes — body + added weight | High | Meaningful stimulus for improvement |
| Swimming | No | Low | Cardiovascular health, not bone density |
| Cycling | No | Low | Cardiovascular health, not bone density |
The Mechanics of Load: How Much Is Too Much?
Most online advice goes wrong here. You’ll find articles citing specific heart-rate percentages as the threshold for effective bone loading. Don’t believe them — those numbers are fabricated, and no credible source cites a verified heart-rate zone for bone stimulation. The honest answer is simpler: bone and connective tissue adapt more slowly than your cardiovascular system, which means gradual progression is the mechanism that actually protects you. Not a number on a screen.
Bone tissue responds to mechanical loading through Wolff’s Law — essentially, bone remodels itself in response to the forces placed upon it. When you load bone gradually, the remodelling process keeps pace with the stress. When you overload it — either with too much weight or too rapid an increase — the bone can’t repair itself quickly enough. That is when you move from stress reaction to stress fracture, representing a continuum of bone injury resulting from repetitive mechanical loading that exceeds the bone’s capacity for repair.
The practical signal isn’t a heart-rate monitor. It’s your own body. Breathlessness during conversation is a sign the intensity is cardiovascular-dominant rather than load-dominant — back off slightly. Joint pain — particularly in the knees, hips, or shins — is a genuine warning sign that the load or distance is exceeding what your connective tissue can handle right now. That is the signal to reduce, not push through.
In practice: progress over weeks, not sessions. If you add load this week, give your body two to three weeks to adapt before adding more. If you increase distance, hold weight steady. Never increase both simultaneously. This is the missing step that most beginners skip, and why the progression framework matters more than any specific starting weight.
Stop, Start, Slow progression guide:
- Stop if you feel sharp, localised pain — not muscle soreness, but joint pain or bone-level aching that doesn’t ease after a warm-up
- Start each session with a shorter distance or lighter load than your previous session if you’re increasing load — warm up into it
- Slow your progression if you notice new aches that persist beyond a couple of days after your session — this is your body telling you the adaptation window needs more time
The mistake beginners make isn’t usually starting too heavy — it’s increasing too fast. It’s a familiar pattern in rucking communities: someone adds 15–20% to their load in a single jump, develops sharp shin pain within a week or two, and has to drop back to their previous weight to recover. The load itself usually wasn’t the problem. The rate of increase was.
Starting Weights by Scenario
The “right” weight isn’t a single number. It depends on where you’re starting from, your goals, and whether you have any bone health conditions that require extra caution. Here is the honest framework, mapped by scenario.
📺 Watch: How to Adjust Backpack Straps (No Shoulder Pain!) — Oscar Hikes
Scenario 1: Beginner — 0 to 6 months rucking experience
Most UK-facing rucking guidance starts around 5–10% of body mass for beginners. A 70 kg person is looking at roughly 3.5–7 kg to begin with. At this stage, the goal isn’t maximum bone stimulus — it’s establishing consistent movement patterns, building shoulder and hip endurance under load, and letting your connective tissue acclimatise. Focus on form and comfort before you focus on weight.
If 5–10% feels trivial, that’s the point. You aren’t testing your limits on week one; you’re building the foundation. This is also why the percentage is a starting point, not a rule: on muddy or hilly terrain, even a correctly calculated 10% load can be too much for the knees. Dropping the weight and adding distance instead often delivers the same stimulus without the joint strain — terrain difficulty and load aren’t interchangeable, and a lighter pack on hard ground can out-work a heavier one on flat ground.
Scenario 2: Intermediate — 6+ months consistent experience
Once you’ve built a consistent base — 2–3 sessions per week over several months — you can work toward 10–15% of body weight. At this stage, terrain becomes a variable worth managing. A 10 kg load on a flat canal towpath feels different from the same weight on a muddy hill. Factor in the extra effort British terrain demands before adding load.
Scenario 3: Osteoporosis or osteopenia diagnosis
If you’ve been diagnosed with osteoporosis or osteopenia, the starting point is lower and the need for professional input is higher. Common guidance suggests 2–5% of body weight initially — in practice, often as little as 2–3 kg while you build confidence and form. The Royal Osteoporosis Society is clear: people with osteoporosis should be doing resistance exercise, impact exercise, spinal extension exercise, and balance work to reduce falls. That combination is what the guidance is built around — not rucking alone.
More importantly: if you’ve been diagnosed with osteoporosis, talk to your GP or health specialist before starting a new exercise programme to make sure it’s right for you. This isn’t a hedge — it’s the honest step that protects you. With a history of stress fractures in particular, it’s common for a physio to recommend bodyweight walking only for several months before any load is introduced. That’s not a failure to progress; that’s doing it safely.
Scenario 4: UK terrain considerations
British walking terrain is genuinely demanding. Muddy coastal paths, steep hills, uneven ground — these all add effort beyond what the same distance on a flat road would require. When planning your load, factor in the surface you’ll be walking on. A 10 kg ruck on the South Downs in winter is a harder workout than 10 kg on a tarmac path. Some guides suggest staying well under 20% of body mass for general fitness use, and that ceiling makes even more sense if your regular routes include hills and soft ground.
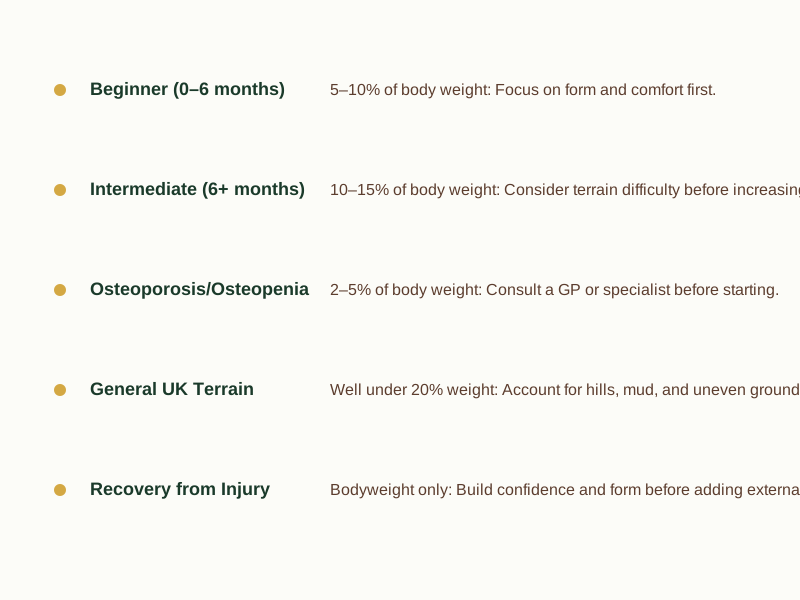
As a quick reference, here’s how those four scenarios stack up side by side:
| Experience Level | Starting Load | Notes |
|---|---|---|
| Beginner (0–6 months) | 5–10% of body weight | Focus on form and comfort before focusing on weight |
| Intermediate (6+ months) | 10–15% of body weight | Factor in terrain difficulty before adding load |
| Osteoporosis/Osteopenia | 2–5% of body weight | Consult a GP or specialist before starting |
| General UK Terrain | Well under 20% of body weight | Account for hills, mud, and uneven ground |
| Recovery from Injury | Bodyweight only initially | Build confidence and form before adding load |
Not sure if your current gear is safe for the loads we’re describing here? Get the Free First Ruck Gear Checklist to audit your kit before you start progressing.
Gear That Handles the Load
The right gear won’t make up for poor progression, but the wrong gear can undermine an otherwise sensible programme. Here is what to look for and where the trade-offs sit.
Weighted vests: stability is the non-negotiable
A vest that shifts during walking is more than an annoyance — it’s a safety issue. The load needs to stay close to your centre of gravity to maintain balance, and any lateral movement increases shear force on your shoulders and spine. When buying a weighted vest, prioritise a secure chest strap and a design that holds the weight high on your torso. Some buyers on UK forums have noted that cheaper vests with loose sand pouches start sagging and shifting within a few months of regular use — the weight migrates downward, which changes the load distribution and increases strain.
Owners of purpose-built options like the GORUCK Rucker (paid link) consistently note that the stable, close carry is the main reason the premium price is worth paying for regular ruckers. The plate sits high and close to the back, which reduces bounce significantly compared to a basic backpack. The trade-off is cost — these purpose-built packs sit at £180–£220, versus £40–£80 for a capable Decathlon or Osprey alternative — and the fact that they aren’t versatile daily bags.
See GORUCK Rucker on Amazon → (paid link)
Rucksacks: hip belt is where the load moves
If you’re using a rucksack rather than a vest, the hip belt isn’t optional — it’s load-bearing equipment. A properly adjusted hip belt can move a significant portion of the weight from your shoulders onto your hips, which is where your skeleton handles it best. A hip belt that’s too narrow concentrates load onto a strip of skin no wider than a hand, which is exactly where chafing starts under longer sessions.
The common complaint with budget rucksacks — particularly those bought for general hiking rather than rucking — is that they sit too low and slide down with each step. Tightening the chest strap helps, but the real fix is a pack designed for load-bearing, with a structured back panel that keeps the weight high and close. For a rucksack that handles this well, the Karrimor SF Predator 30 is a robust, modular option at a lower price point than the premium brands, though the stitching and finish aren’t as refined.
Footwear: the weak link under load
Repeated loaded walking increases forefoot compression and heel strike forces. UK reviewers commonly report faster outsole and cushioning wear, especially on harder urban surfaces like concrete seafronts. A shoe that works fine unloaded can create hot spots once 15–20 kg is added, because the foot flattens and lengthens slightly under load.
For muddy UK terrain, the Salomon Speedcross Peak (paid link) — the budget entry point into Salomon’s Speedcross line — has strong grip and a comfortable initial fit; the trade-off is that comfort fades on longer sessions, it runs warm, and it’s better suited to occasional muddy walks than heavy daily rucking mileage. On harder trails and mixed terrain, the Hoka Speedgoat 7 (paid link) offers plush cushioning that absorbs more of the impact shock, though some buyers report the toe box feels wide and the shoe can struggle in very muddy conditions.
Check Hoka Speedgoat 7 price → (paid link)
See it on Amazon → (paid link)
If you’re on a tight budget, Decathlon’s Evadict range is a functional entry point — it does the job for trail walking under load, though the grip on descents is less confidence-inspiring and durability issues (sole separation, delamination) show up more often than on premium options.
When to See a Doctor
This section matters more than the gear talk. If you’ve been diagnosed with osteoporosis or osteopenia, or if you have a history of stress fractures, joint replacements, or other bone and joint conditions, speak to your GP or a physiotherapist before starting weighted training. This isn’t a sign of weakness or caution for its own sake — it is the step that ensures the programme you’re building is actually right for your situation.
NHS guidance is direct on this: if you’ve been diagnosed with osteoporosis, it’s a good idea to talk to your GP or health specialist before starting a new exercise programme to make sure it’s right for you. Mayo Clinic’s advice lands in the same place from a different angle — talk to your doctor before you start, because what’s appropriate for one person’s bones may do nothing for another’s. The Royal Osteoporosis Society offers guidance on exercise with osteoporosis specifically, including the types of movement (resistance, impact, spinal extension, balance) that its “Strong, Steady and Straight” clinical consensus recommends.
This article is educational — it explains the mechanism of bone loading and provides a practical progression framework. It does not constitute medical advice and cannot account for your individual health situation. That is between you and a qualified professional who knows your history.
If you’re experiencing persistent pain — particularly joint pain, bone-level aching, or pain that doesn’t ease after rest — see a GP or physiotherapist. Don’t self-diagnose and don’t push through it. The progression framework in this article is designed to prevent exactly that kind of injury, but no article replaces professional assessment when something feels wrong.
Frequently Asked Questions
Can I use a backpack instead of a weighted vest?
Yes, but the load placement matters more than the container type. A backpack works if you can keep the weight high and close to your back — a loose, low-sitting pack bounces with each step and transfers more strain to your shoulders and spine. A vest can offer more stability for beginners specifically because it limits how far the weight can shift, but a well-adjusted rucksack with a proper hip belt achieves a similar result. The honest answer is that either works if the fit is right; neither works if the load is bouncing and sliding.
How often should I ruck for bone density?
A practical target is 2–3 sessions per week, with at least one rest day between loaded sessions to allow your bones and connective tissue to adapt. This frequency aligns with NHS guidance recommending muscle-strengthening activity on 2 or more days a week for adults. Consistency over months matters more than any individual session. Two or three solid sessions a week, progressing gradually, is better than one intense session followed by a week off.
Is running with weight better than walking?
Running with weight puts more stress on joints and bones — and for most people, especially those over 40, that additional impact is a risk rather than a benefit. Running already multiplies the forces travelling through your knees and hips compared to walking; adding load amplifies that further. Walking is generally the safer starting point for bone density work, and once you’ve established a solid loaded-walking base, you can make an informed decision about whether running with weight is appropriate for your situation. If joint pain appears, that is your answer — walk instead.
What if I feel pain during a session?
Stop immediately. Sharp or localised pain — particularly in joints — is a warning sign, not a sign of effort. Muscle soreness and fatigue are normal; joint pain, bone-level aching, or pain that feels like it’s coming from deep within a limb are not. Back off the load or the distance, assess what’s different (new route, new shoes, faster pace, more weight), and address that variable before your next session. Persistent or worsening pain is a GP or physio matter, stated plainly.
Rate Beats Number
Rucking is one of the most practical tools available for bone density work — it takes the resistance stimulus you need and puts it into an activity that fits into real life, whether that’s a weekend walk on the South Downs or a loop around your local park. But only if you approach it with the right framework.
The mechanism is straightforward: bone adapts to load when that load is applied gradually and consistently. The mistake most people make isn’t starting too light — it’s progressing too fast, either by adding too much weight at once or by increasing load and distance simultaneously. The fix is equally straightforward: add load over weeks, not sessions, and treat joint pain and breathlessness as signals to scale back rather than badges of effort.
Go back to the opening question — how heavy is too heavy — and the honest answer is that it was never really about the number. Whoever starts lighter than feels necessary, progresses slowly, and actually listens to what their body reports back is doing more for their bones than anyone chasing a percentage they read somewhere else. Rate protects you; the figure on the vest barely matters as long as the rate of change stays sane.
Now you know what a safe starting point looks like and why the progression framework matters more than any specific percentage. Get the Free First Ruck Gear Checklist to audit your current kit and plan your first weighted walk with confidence. If you have questions about specific gear or your situation, get in touch, or read our full breakdown of what UK guidance actually says about weighted training and bone density.
This piece draws on guidance from the Royal Osteoporosis Society, the NHS, and Mayo Clinic.
As an Amazon Associate we earn from qualifying purchases. The products linked above are ones we recommend based on independent research and owner feedback.