How to Make a DIY Ruck Plate (Without Breaking Your Back)

As an Amazon Associate we earn from qualifying purchases. This page contains affiliate links — if you buy through them, we earn a small commission at no extra cost to you.
A brick rattling around the bottom of a rucksack is not a ruck plate. It’s a liability that shifts your centre of gravity with every step, stresses your shoulders asymmetrically, and turns what should be a strength-building walk into something that works against you. Get two things right — rigidity and security — and that same brick stops being a liability and becomes a legitimate way to start.
That distinction matters because purpose-made plates aren’t cheap. Prices for UK rucking gear vary widely: a basic budget plate can be picked up for well under £20, while a branded option from GORUCK or a similar specialist maker climbs past £50. For someone not yet sure whether rucking is going to stick, that’s a lot to commit to a metal rectangle before you know you’ll use it. So the real question isn’t whether you’re allowed to DIY it — it’s whether you can build one that’s genuinely safe, and what “safe” actually requires.
This article walks you through how to do that properly — and, just as importantly, when the DIY route stops making sense and it’s worth upgrading.
Why DIY Ruck Plates Are a UK Rucking Staple
The UK rucking community has never been short on ingenuity. With purpose-made gear priced in a range that puts it out of reach for casual experimenters, most people start by improvising. The common household items pressed into service are a genre of their own: cast-iron gym plates, masonry bricks, books, water bottles, and sandbags all get pulled into service as makeshift loads.
The logic is straightforward — you’re trying to add weight to a pack, and most people already own something heavy. There’s no special alchemy required; the weight is the product. It’s a well-worn starting point precisely because it removes the barrier to entry: you don’t need to solve the whole equipment question before your first walk out the door.
The trade-off is time and effort rather than just money. Building a DIY plate that performs requires wrapping, securing, and fitting — it’s a bit of a faff compared to dropping a purpose-made plate into a dedicated pocket. But the material cost is near zero if you’re using gym equipment you already have, or a few pounds for a house brick from a hardware shop. For a beginner testing the waters, that trade-off makes sense.
What the DIY route doesn’t save you is attention to fit. The moment your improvised weight starts shifting mid-stride, you’ve created a different problem to the one you were trying to solve.
The Mechanics of a Safe Ruck
This is the section that separates a useful DIY guide from a dangerous one. The mechanism that matters here is load stability — keeping the weight high on your back and close to your spine, so it moves with your body rather than against it.
📺 Watch: Most Do This Incorrectly - How To Pack Your Backpack Like A PRO! - Outdoor Basics — TheOutdoorGearReview
When weight sits low in a pack or shifts during movement, it pulls your centre of gravity backwards and downwards. Your body compensates by leaning forward, which overloads your lumbar spine. On a short, light walk that compensation isn’t a major issue. On a 45-minute ruck with 15kg or more, it’s the difference between a session that builds posterior chain strength and one that creates a lower back problem.
The bounce factor compounds this. A loose weight that rocks with each step doesn’t just stress your spine — it creates friction against the inside of your pack. This is where the blister and chafing risk comes from in practice: less from the plate itself and more from pack movement, poor strap fit, and friction from an unstable load.
Force Fitness puts it plainly: weighted rucking backpacks distribute weight evenly across your back and shoulders, reducing strain and potential injury. That design principle — even distribution, high and close — is what you’re trying to replicate with a DIY setup.
The verdict on DIY is conditional but honest: a DIY plate is acceptable for light use if, and only if, the load is rigid and secured tightly. “Light use” means sessions under 30 minutes, weights under 10–12kg, and no running or fast movement. The moment you’re looking at longer sessions, heavier loads, or interval work, the risks of an improvised load outweigh the cost saving.
Here’s the practical rule: if your posture starts breaking down — if you’re leaning forward more than you would unloaded, or if you feel the weight pulling you off-centre — the load is too heavy or too poorly secured. That’s the feedback loop that matters, not the weight on the label.
Step-by-Step: Building a Rigid DIY Plate
The core principle is simple: you want a rigid object wrapped into a stable package that sits close to your spine. Everything else is detail.
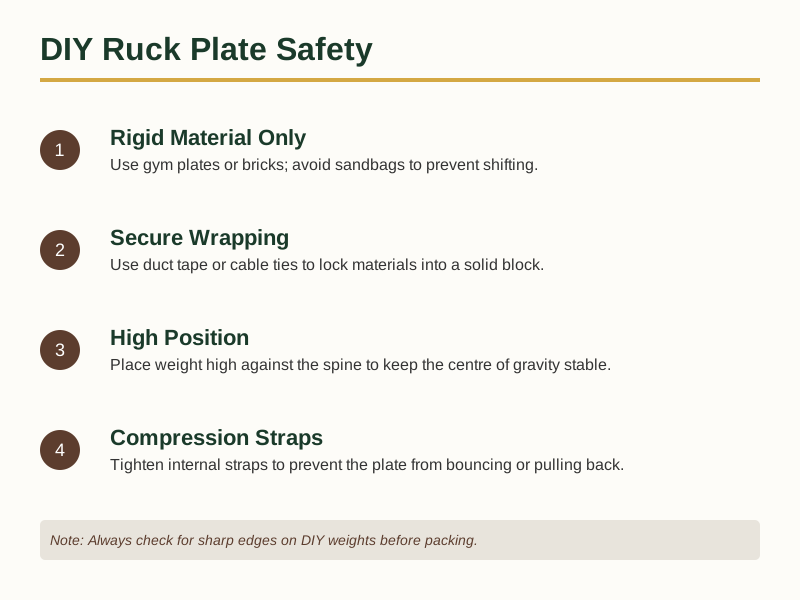
Material selection comes first. Rigid items only — gym plates, house bricks, or a tightly packed stack of hardcover books. Sandbags and water bottles are not suitable. They shift under gravity, compress under the weight of other items, and create the bounce and friction that makes rucking dangerous. Skip them.
The most practical option for most is a standard cast-iron gym plate. They’re dense, rigid, and shaped to fit reasonably well against a back panel. A 10kg or 15kg plate gives you enough range to train progressively without buying multiple weights.
At a glance, here’s how the common options stack up:
| Material | Suitability | Notes |
|---|---|---|
| Cast Iron Plate | High | Rigid, dense, fits back panel well |
| House Brick | Medium | Rigid but requires careful wrapping |
| Hardcover Books | Medium | Stack must be rigid and wrapped tightly |
| Foam Lagging | High | Adds cushioning and grip to rigid objects |
| Sandbag | Low | Shifts and compresses, unsafe for rucking |
| Water Bottle | Low | Moves with gravity, creates instability |
The wrapping method is where the engineering happens. Take your rigid object and wrap it in one of two ways:
- Heavy-duty bin bag method: Double-bag the plate inside heavy-duty refuse sacks, then wrap the whole thing in duct tape. The bin bag creates a smooth outer surface; the duct tape holds it under compression and adds abrasion resistance. The result is a wrapped block that won’t scratch your pack lining and won’t shift once secured.
- Foam pipe lagging method: Wrap the plate in several layers of foam pipe lagging, held in place with cable ties or tape. This adds a small amount of cushioning and friction, which helps the plate grip the pack interior rather than sliding.
Either method works. The goal is a rigid, dimensionally stable package that doesn’t deform under load or compress over repeated sessions.
Securing it inside the pack is the final and most important step. A rigid plate dropped loosely into a backpack will still shift — gravity and momentum don’t care how well you’ve wrapped it. You need to lock it down. The most reliable approach is a compression strap running horizontally across the top of the plate, pinning it against the back panel. Most decent rucksacks have these; if yours doesn’t, a simple luggage strap threaded through the existing shoulder strap attachment points does the job.
The ideal position is high in the pack, directly against the back panel, with no gap between the plate and the panel. This keeps the weight close to your spine and prevents it from rocking away from your body with each step.
Weight check before you head out: start lighter than you think. For a first ruck with an improvised plate, 5–8kg is a reasonable starting point. If you can walk with it for 20 minutes without noticing significant posture change, you’re within the safe range. If you’re leaning forward noticeably by minute 10, drop the weight or reconsider the approach.
If you’re serious about rucking regularly, it might be worth checking whether the gear you’re using is actually set up to support load safely. Get the Free First Ruck Gear Checklist — it covers the pack, plate, and fit essentials in one place.
When to Upgrade to Purpose-Made Plates
There comes a point in every rucker’s journey where the DIY approach hits its ceiling. Knowing when you’ve reached it is part of training intelligently.
Match the gear to how you’re actually training. Someone rucking twice a week or more is in a different position to someone doing one light walk a month — the time spent wrapping, securing, and checking an improvised plate stops being worth it once frequency climbs. A GORUCK Rucker (paid link) or a solid UK alternative like the Mirafit Ruck Plate slots into a dedicated plate pocket and stays exactly where you put it — no adjustment, no re-securing, no checking whether the duct tape has worked loose.
Check Amazon price → (paid link)
Durability is the second factor. Purpose-made plates are cast or moulded to tolerances that resist cracking and chipping under repeated load cycles. A cast-iron gym plate will survive a lot, but the edges can chip if they’re not wrapped well, and the coating on cheaper plates can flake over time. A dedicated ruck plate is designed to be dropped, loaded, and used hard without that degradation.
Fit is the third. Purpose-made plates are contoured to sit close to the back and high in the pack — the exact position that keeps load stable and reduces spinal strain. Flat gym plates are rectangular or circular, and even wrapped, they don’t conform to a pack’s back panel the same way. The result is a small but consistent gap that allows micro-movement with every step. Over a 60-minute ruck, that micro-movement compounds into meaningful fatigue.
Read your own situation honestly: if you’re rucking as part of a structured fitness programme, training for events, or using rucking as your primary cardio, that’s a commitment level where the injury-prevention and durability benefits of purpose-made gear are worth paying for. If you’re doing a weekly weighted walk with a light load and you’re happy with your DIY setup, none of that applies to you yet — there’s no urgent reason to change.
For UK buyers who want a purpose-made plate without the GORUCK price tag, the Mirafit Ruck Plate sits at the honest budget end of the market — accurate weight, decent fit in most dedicated plate pockets, and a fraction of the cost of the premium options. The trade-off is a flatter profile and a more basic finish, but for most users doing standard weighted walking, it does what it says on the tin.
Frequently Asked Questions
Can I use a sandbag instead of a plate?
No. Sandbags shift under load, compress unevenly, and don’t provide the rigid surface that keeps your pack stable. They create the exact bounce and friction that causes injury over longer sessions. Use a rigid object — a gym plate, a house brick, or a stack of books — and wrap it securely.
How much weight should I put in a DIY plate?
Start lighter than feels necessary. A good rule of thumb is to aim for a weight you can carry for 20 minutes without your posture changing noticeably. If you’re leaning forward more than you would unloaded, or if you feel the load pulling you off-centre, drop the weight. Progression matters more than immediate intensity — add load gradually over weeks, not sessions.
Is it safe to DIY ruck plates?
It’s safe if the load is rigid and secured tightly against the back panel of your pack with no room to shift. If the weight moves during walking or running, it becomes unsafe regardless of how heavy it is. The risk isn’t the material — it’s the instability. Get the fit right and a DIY plate is a legitimate entry point. Get it wrong and you’ve built a lower-back liability. This is general guidance rather than a medical assessment, so if you’re carrying an existing back or joint problem, get it checked by a GP or physio before you load up.
Where to Go From Here
The trade-off between DIY and purpose-made gear isn’t really about cost — it’s about commitment. A DIY plate is a valid way to find out whether rucking suits you before you commit to specialist kit that can run well past £50. It teaches you what to look for in a plate (rigidity, stability, close-to-spine positioning) without the sunk cost of gear that might gather dust.
The moment you decide rucking is going to be part of your regular training, purpose-made gear earns its price. Better load stability, better durability, and a fit designed for the movement pattern means you’re getting a tool that works with you rather than one you’re constantly managing.
If you’re not sure yet whether your current setup is up to the job — or whether you’re ready to make the upgrade — grab the free checklist. It walks through the pack, plate, and fit essentials so you can see exactly where you stand and what, if anything, needs to change. Get the Free First Ruck Gear Checklist
Related Guides
For a complete overview, see our GORUCK GR1 vs Budget Rucksacks: What Actually Matters for Rucking in the UK.
What Backs This Up
The weight-distribution mechanism referenced above comes from Force Fitness, the budget-end pricing comes from checking Mirafit’s current ruck plate range, and the premium comparison point is GORUCK’s own plate line.
As an Amazon Associate we earn from qualifying purchases. The products linked above are ones we recommend based on independent research and owner feedback.