How to Break in Boots for Rucking (Without the First-March Blister Fest)

Heel on fire by the first hill. Laces that won’t sit right no matter how many times they’re redone. Feet sliding forward on every step down a slope. Three symptoms, one shared cause — and it isn’t a bad boot.
Twenty minutes of pacing round the living room is the standard break-in advice, and it tells you almost nothing about how a boot behaves once it’s carrying weight. A boot that fits perfectly unloaded can still fail once loaded, because load is what changes the fit: the foot settles differently, the heel presses differently, and the whole contact between skin and boot shifts the moment a pack goes on.
That’s the gap most break-in guides skip. Here’s how to close it before your first event, not during it.
The “Unloaded” Test: Why Walking Alone Isn’t Enough
Most break-in guides start with “wear them around the house.” That’s not wrong, but it’s incomplete in a way that matters.
A boot that fits your foot perfectly when you’re walking to the shops develops new pressure points the moment you add load. The reason is mechanical: weight redistributes pressure across the sole and changes how the foot settles into the boot. Without load, you’re testing a scenario that doesn’t exist once you’re carrying a ruck.
Added weight also shifts your centre of gravity forward slightly, which changes how your foot sits inside the boot at heel strike and toe-off. The heel counter that felt supportive unloaded can start digging in once your body weight plus kit is pressing down with every step. The toe box that seemed roomy can press against the top of your foot once the arch compresses under load.
The friction element is the other piece. Without load, the foot barely slides forward inside the boot; the problem that causes blisters doesn’t even exist in the test scenario. Add weight and the foot shifts forward with each step, creating shear force against the boot upper. That’s where friction and blisters come from.
The mechanism is straightforward: load changes how the foot sits and flexes inside the boot, and a boot that fits fine unloaded can create new pressure points once weight is added. The missing step is breaking the boots in under load, not just in them.
The Loaded Walk Protocol: A UK-Specific Guide
The fix is simple in principle. Do your break-in walks with actual weight — a loaded ruck or a ruck plate in a pack. A few short loaded walks around the house or your local park will reveal exactly where the boot digs in, slides, or creates friction.
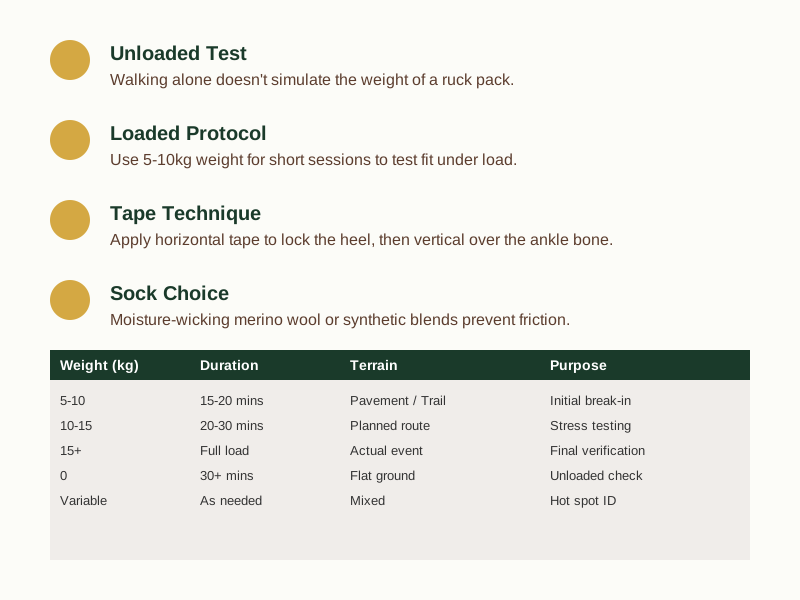
Use roughly 5–10kg to start with. That’s enough to change how your foot behaves inside the boot without being heavy enough to cause issues if something isn’t sitting right.
Here’s how to run the test:
- Keep the session short — fifteen to twenty minutes is enough
- Walk on terrain that matches your planned route (pavement for urban, trail for countryside)
- Check your feet during and after the walk for any heat, tightness, or rubbing
- Note where any hot spots develop — that’s where the tape or sock adjustment goes
The logic is that you’re not just breaking the boots in. You’re breaking them in to your foot’s movement under load. That process takes a few sessions. Three or four short loaded walks over the week before your event will reveal fit problems while they’re still easy to address with a sock change or lacing tweak.
It costs you three evenings. It saves you from finding out how bad an unbroken boot can get eight kilometres into your first event — that trade is not close.
Once you understand why the friction happens — the foot sliding forward under load — the protocol makes sense. The boot adapts to your foot’s movement with weight over those few sessions. By the time you’re loading for real, the fit has settled.
If you’re looking at a rucking event and wondering what else needs to be right before you go: get the Free First Ruck Gear Checklist — it covers the key items that determine whether your first ruck goes smoothly.
The Blister-Proofing Tape Technique
Hot spots happen even with careful break-in. When they do, leukotape is one of the most widely recommended options for taping them — but the application matters as much as the product.
The core technique: cut the tape longer than the hot spot, extending well beyond its edges. That wider surface area prevents the tape from curling at the edges and losing grip.
A horizontal strip across the heel does a specific job. It anchors the heel against the counter and resists the boot slipping off — which is why it’s effective for securing the heel. However, the horizontal orientation doesn’t align with the primary direction of the foot sliding forward.
Vertical taping points the other way. It aligns with the foot’s forward slide and resists that force more effectively. But vertical tape alone doesn’t provide enough surface area to keep the tape from slipping off the heel on its own.
The practical solution is layering both — start with horizontal tape to lock the heel in place, then apply vertical strips over the ankle bone to resist the forward slide. It’s not as neat a single-method answer, but it’s what experienced hikers default to when one approach alone isn’t holding.
Cut longer than the hot spot. Horizontal first, then vertical over the ankle bone. That’s the sequence.
Sock Choice: The Unsung Hero of Boot Comfort
Tape is reactive. Socks are preventive. Get the sock choice right and you reduce the chance of needing tape in the first place.
📺 Watch: WARNING: Don’t Buy Cheap Merino Wool Socks! — Oscar Hikes
Moisture-wicking materials — merino wool and synthetic blends — move sweat away from the skin. Cotton holds moisture against the foot, which softens skin and increases friction. Cotton socks are the main culprit behind the “sticky foot” feeling that shows up at the end of a long ruck.
Merino wool is a common first choice for rucking. It manages moisture, regulates temperature, and stays comfortable over long distances. Synthetic blends are the practical alternative — they dry faster and cost less. For a beginner who wants one pair that works across conditions, merino is the call, but the honest answer is that either beats cotton. A solid starting point is the Darn Tough Run (paid link) — a reinforced merino pair built to handle exactly the friction this break-in protocol is designed to catch early.
Check Darn Tough Run price → (paid link)
Double-layer socks are another option worth knowing about. A thin liner sock under a thicker outer sock reduces friction between the two fabric layers rather than between skin and sock. Some ruckers combine this with taping hot spots for a belt-and-braces approach.
The common mistake is treating socks as an afterthought — get the sock wrong and taping stops being a backup plan and becomes damage control.
When to Stop: Recognising the Signs of a Bad Fit
Some discomfort is normal during the break-in period. A stiff heel counter or a firm midsole can cause temporary soreness that eases over the first few sessions. Distinguishing that from a fit problem that won’t resolve is the key skill here.
Persistent pain in a specific area — the heel, the ball of the foot, the outer edge of the big toe — after multiple sessions is a sign the boot isn’t settling into the right shape for your foot. Numbness or tingling in the toes is a different matter entirely and worth getting checked. Hot spots that appear in the same location every single time, regardless of socks or tape, can indicate a pressure point that needs a different boot shape or an insole adjustment rather than more break-in time.
Runner’s Toe and When to Get It Looked At
Runner’s toe — a bruised, darkened toenail caused by blood collecting under the nail — typically comes from boots that are too tight or from the foot repeatedly sliding forward into the toe box. Swollen feet on longer walks make this more likely. One instance might be a bad day or an unusually long route. Recurring runner’s toe is a boot-fit issue, not a rucking-ability issue.
If you’re experiencing persistent pain despite trying different socks and adjusting your lacing, a podiatrist can assess your gait and arch type and determine whether a different boot shape or a custom insole would help. Everything above is general guidance rather than a diagnosis — if something isn’t settling after a few sessions, get it looked at rather than pushing through.
Ruck Weight & Session Guidelines
| Weight (kg) | Session Duration | Terrain Type | Purpose |
|---|---|---|---|
| 5–10 | 15–20 mins | Pavement / Trail | Initial break-in test |
| 10–15 | 20–30 mins | Planned route | Stress testing fit |
| 15+ | Full event load | Actual event | Final verification |
| 0 | 30+ mins | Flat ground | Unloaded comfort check |
| Variable | As needed | Mixed | Hot spot identification |
Frequently Asked Questions
How long should I break in my boots before my first ruck?
Aim for three or four short loaded walks spread over the week before your event. That’s better than one long walk crammed into the day before — your feet need time to adapt, and the gradual approach reduces the risk of showing up to the start line with sore feet before you’ve even loaded the ruck.
Can I speed up the break-in process by wearing boots in the shower or using heat?
The short answer is no. Wearing boots in hot water or applying direct heat can damage the boot’s structure or cause the glue to fail. Gradual loaded walking is the safer and more reliable method.
What if I get a blister during a ruck?
Stop and address it. A small, intact blister with clear fluid can be taped over and you can continue. A large blister or one that’s already torn and bleeding is a different situation — continuing increases pain and infection risk. If you’re deep into a ruck and can’t extract without compromising safety, pad around it and finish carefully, then clean and dress it properly once you’re back.
The discomfort of a proper break-in is temporary. The confidence of finishing a ruck with intact feet is worth it. Blister prevention comes down to three things: breaking in your boots under load, choosing the right socks, and using tape on hot spots before they become a problem. These aren’t accessories to the main process — they are the process.
Now you know what to look for — get the Free First Ruck Gear Checklist to make sure everything else is in place before your first ruck.
The Short Print
None of this is exotic advice, so here’s where it comes from and where to go next. The blister mechanics and taping method draw on the NHS’s own advice on blisters and the British Mountaineering Council’s guide to friction blister prevention. For the load-carriage side of things, the Royal Army Physical Training Corps has been thinking about marching under load for a lot longer than the rucking trend has existed. And if it’s the boots themselves still in question rather than how you break them in, What Shoes Survive a 20kg Ruck in the UK? covers the buying side of the same problem.